Support QRP CoA Everywhere

Tuesday 28 August 2018

tinkercad to make mi0iou wobbulator enclosure

Not found one (must be one out there somewhere) but going to use tinkercad to design and enclosure for my old raspberry pi A based version.

See https://github.com/mi0iou/RPi_Wobbulator for details of the project


The boards approximately:

Will now create an box enclosure and then copy the boards onto it, but as a 'hole' so you get all the openings in the correct place.

Have gauge with me today so will measure those SMA connectors and the pots a bit better.

Saturday 25 August 2018

shack needs sorted out as had to move stuff to operate as had issue finding space!

Far too much stuff in there so in between qso for GQRP summer sizzler looking at what is in the shack and cleaning up a bit.

Over a years worth of older IT and Radio magazines can go, plus all the older QSL cards, as scanning them now. http://m1kta-qrp.blogspot.com/2016/12/new-qsl-scanner.html

Not sure about the piles of buro and clublog card requests where I said electronic only. Might just grab random card, stick on a label and send it back.

Thursday 23 August 2018

LF TX

As coming into the winter months again and LF is dominating for a while going to improve the LF options a bit.

I had  used an IRF510 based PA based on http://www.gw3uep.ukfsn.org/25W_QTX/472_25W_QTX/472_kHz_25W_PA.htm with one of G3YXM/G0MRF's  transmitters. I had played with transverters using  10MHz/30m and not the more usual 10m/30MHz. Antenna was an inverted L.

The bench certainly had a Graham VK3XDK 472KHz transverter for KX3  completed but not in an enclosure so I will have to pull it all together again and finish it off.

I note previously I had used 22mm or 25mm, http://m1kta-qrp.blogspot.com/2013/02/472khz-25w-pa.html cannot remember which, white PVC conduits as the LPF coil foms. I see there are some nice 3D printed LPF coil forms for 472KHz available so will try to source the STL files and take a look.


Buddipole guy rig

Used my buddipole all over the place and one thing that is a major pain is if it is windy or is tugged over (later happens far too often) it can be a pain. I ofgten just attach the carry bag to the bottom of the tripole and fill it with sand/stones.

Anyway whilst looking for something else I found this:
https://www.thingiverse.com/thing:2911912 and thought THAT is exactly what I need.

He used BB gun pellets to allow the rotation which are 6mm diameter, pretty sure I have some steel ball bearings with the same diameter and as I cycle I have lots of lithium grease.


And it is of course in the correct colour for qrp.

My own print photos etc will go here:

The 6mm metal ball bearings have cleaned up nicely.
Now to look at that lithium grease.

CNC end stops

Since http://m1kta-qrp.blogspot.com/2018/08/end-stops-to-cnc2418.html had a rethink after finding I had some nice (larger) micro switches so will build some locations and wire them in instead.

I see someone did this for their 1610 CNC and the parts are in thingiverse.


This is what I added:


After having fun drilling 2mm holes and using M2.5 hex head screws I did the same for the X stops and mounted the switches.


I set them up so the whole drill assemble when moved on the X axis towards an end stop will trigger it.


The Z switches I need slightly longer arms on the switches, or will have to add something to the bed to switch it. Procrastination time needed. Use slightly longer screws and lock nuts too.


I also added some nice new 8x5 bearing couplers too. The one on the Z axis looks fine for now but might take it apart and replace.


Tuesday 21 August 2018

3D scanner

As had a bit of fun trying to reverse engineer some parts for a ghost hunter (I am a not a believer!) I thought it would be fun to sort out a 3D scanner. So I have decided to make one. It might not be very good initially but I am sure I'll learn.

https://www.instructables.com/id/Build-a-30-laser/

The idea is pretty simple really place an object in the field of view of the camera and then using vertical lasers slice the outline, capturing the laser profile/lines, turn the object and create a wire frame. I am sure it might be a tad noisy initially.

The parts all printed last night. after the parts all turned up from various places. Will be fun putting it together to test this w/e probably whilst operating during the GQRP Summer Sizzler will add a photo at the time.


Sunday 19 August 2018

End stops to CNC2418

Looks like will add some mechanical end stops to the CNC2418 used for milling PCB.

Have a few options but the simplest might be to use the RAMPS1.4 end stop modules from makerbot.com

Right now only got then one sided and need to probably pair these up. (or reverse that switch mount.


The locations for expected end stops will be


Wednesday 15 August 2018

Raspberry Pi and Octoprint

Just put the systems together... so will cnc own pcb and make cases and parts too.

Two Raspberry Pi 3 B+, 16GB SD, Pi Cameras, Wifi Cards for octoprint and octolapse.

Will print up cases and these will be one for the Creality Ender 3 and one for the K8200 the second will be in the shack.


I may add another Raspberry Pi 2 B+, 16GB SD but without a camera for the CNC2418 currently in the box if looks like can do that. I will print a 7" LCD mount for a 7" TFT I have for it.

The RAMPS 1.4 boards and bits are all here as is the Arduino CNC shield so I'll update them as well. The K8200 will be seeing some stepper motor updates as well as will add a 3D Touch (BL Touch clone), I have a 3ED V6 hot end clone, although it is for 1.75mm, I can try that until the 3mm one arrives. Got the setup can use direct or bowden feed, might try bowden with a sort of Robin 3D or a GT2 belt double sided extruder.
The ring LED illuminator I got a while back will be added, might have to still get a glass bed for the K8200.
The K8200 electrical contacts for the extruder and hot end there is an STL I need to print that will house a series of connector blocks instead of those nasty solder/heatsink bodges, as well as a few other options.

The Ender 3 will add the PetFang ducts and BL Touch. And a draw that fits to the left of the current controller. Might have to redo/reprint the filament feed that fits to the top as the plug had been damaged.
I have a 5V power supply and LED which were for the CNC but might emply them on the ender3 in the meantime.

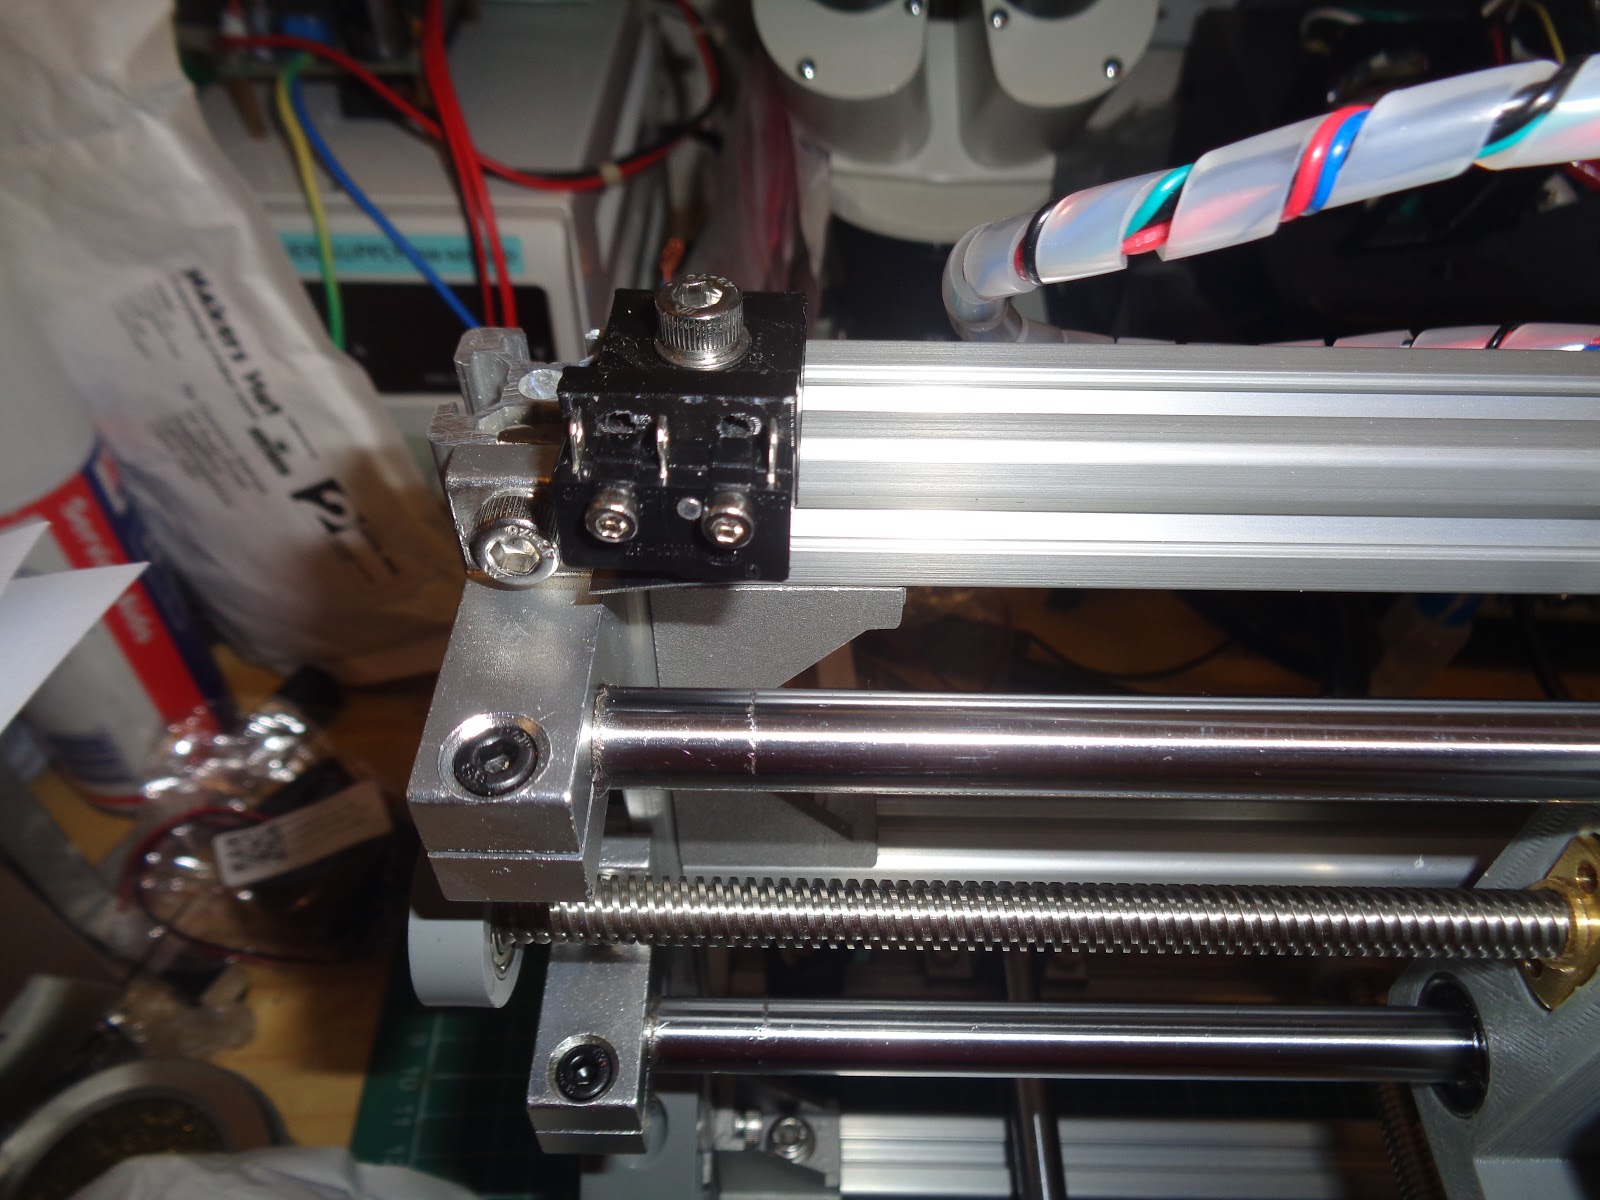
Filament sensors will also get added using the end stops that came with the last RAMPS setup. Marlin Firmware will be recoded and configured for the RAMPS1.4I expect will push the buffers up a bit.

The insulated enclosure for ABS etc, I'll add to the K8200 but not sure will need it now as it will only print PLA, so will probably just use it as a cabinet for it.

Not that I expect fire problems but if going to run the printers remote. I will add/mount a MINI AFO Auto Fire Extinguisher Ball
above the printers, got the first one from Amazon the other day. £25 not exactly much to protect against fire. Already have a few dry powder extinguishers in the workshop and shack.

Sunday 12 August 2018

3mm under Z switch

Photo says it all. Everyone has some HSS drills this packet has nice handy dimensions on the pack too so you know what size you have used, although every drill bit will have it stamped on too.

Place a twist drill bit under the switch mount and then move the extruder mount GENTLY down (I did it manually with the steppers disengaged) and tighten in place so you can just remove the drill bit. Result is Z limit switch is c3mm higher.


You can tell it to move home and you'll see it will now be 3mm higher.

Friday 10 August 2018

Steppers on the K8200

For reference.


Will change these (one is burnt out anyway) for socket versions and change the wiring harness too. It might be worth investigating reducing to stepers with 0.9 degree rotation per step, 400 per revolution but that all depends on costs. I intend adding a second Z screw as well. These are also listed here 42BYGHW811
47.0 N·cm 3.1 V Ø 5 mm 1.8° 48 mm 2.5A 1.8 mH
about half way on the list https://reprap.org/wiki/NEMA_17_Stepper_motor


The current board is OK if a little old. Wouldn't support the second Z axis stepper anyway so has to be replaced. No idea why I never added heatsinks to the stepper motor driver boards.

I discovered I also had a new low profile NEMA 17 stepper, a clone (I think) Titan Aero and a clone all metal E3D V6 hot end (both for 3mm) but I like the idea of remote mounting the extruder to reduce the arm weight. Maybe will not have to if add a second one?


RSGB IOTA 2018 M1K EU011

Random collection of photos from camera

The bag pontoon, they pass the bags from SFerry, Scillonian III onto the other island boats, they all help so it goes pretty quick. The boats from ferry to right are for St Agnes (where I ended up), Bryher and St Martin's.

Base of the 30m and 40m vertical. The connections are to the little black potting box tie wrapped to the pole. The ground was rock hard so the screw at this point only went in a few inches.

So here is the fix... take the pole down (carefully), hand up screw the support in the ground, fill the hole with boiling water, wait 5 mins repeat, then put the screw back in, by hand , fit it with water (not boiling now), I used the wooden spoon handles and screwed the pole right in then as the ground is softer, put the pole back up.


You will need to guy it if it is windy, I had wind for just one direction so somewhat lazily added just a single guy to a cow sorter that was in same field.


The bench with ATS-3B and on 30m


The 80m vertical looks pretty good (is and QRPGuys 60m/80m vertical). I added 6 radials and used a short coiled length of 75ohm coax at the feed as a transmission line.


On 30m and as you can see NO internet.

Got the essential supplies. You can just see the WSPRlite and the fan I'll use later. All the necessary QRP colour of course.


And the power supply proved a handy place for the FANTA

Bloody rabbits liked the feeder so had to raise it.


Bye bye EU011

4SQ builds and big Yaesu rotator.

Got two SJ2W and 1 M1GEO 4 SQ controller to make up.

80m, 40m and 20m (I expect)

Will add to the 30m one I have already.

The dummy loads I have the one I made up, might make another.
For the controller cables should source some CAT5 and make them up.


The rotator, the plan is to ground mount it and rotate a c 20' TV pole onto which I'll add the 23cm yagi, will also be a mount for the DXhexbeam when using from home.

More Photos to follow.

Next big activity w/e is august bank holiday so need to make sure got inter-G working for that.


3D Printer/CNC reorg

K8200 (which I will be refurbing to RAMPS) I will keep as a 3mm filament printer. Will add Octoprint and OctoLapse to this one. Now gone to shack. Orange and Black PLA.

Creality Ender3 1.75mm filament looks like will become main 3D printer. A RAMPS upgrade is on the cards if need to as the current M/B is a bit limited. Got to add bootloader etc, after see that the power resume has been added to the Marlin/TH3D source, or just add it myself. I have a BLTouch but got a glass bed on the printer so might play with if this is worth it. Looks like have to make up the PETSFANG fan shroud. Got a few different nozzles to play with as well as a few different colour filaments.. Will add Octoprint and OctoLapse to this one.

Not tested ABS printing but might, all PLA for now.

The 2418 CNC that will make PCB easily enough is now on workshop shelf, it it's own sound proof box (it makes one heck of a lot of noise routing PCB!) need to finish the calibration after they sent a new motherboard, I have a feeling I'll update it to the Arduino CNC Shield.
Will add a version of Octoprint and OctoLapse to this one I think.


Will add photos bit later.

Found still had all the parts for another CNC engraver from an Instructables build. Not recommended now but as have it I suspect will build it at some point.